At Standard Machine, Inc., our state-of-the-art facilities, and seasoned manufacturing professionals have the capacity to fulfill the challenging requirements of the scientific research industry.
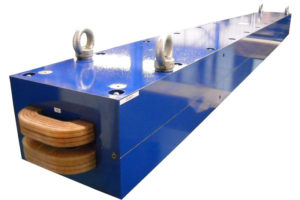
We machined the magnet core assembly shown here for use in a Particle Accelerator, and it demonstrates our unique ability to machine large plate while holding flatness, even after multiple rough, semi-finish, and finish machining operations.
Constructed from 1006 steel, this assembly features dimensions of 157.48″ in length, 11.20″ in width, and 15.88″ in height. We executed various machining techniques, including milling, drilling, tapping, and reaming, to form the Magnet Core. Additional operations included De-burring, assembly, part marking, and application of a Rust-Oleum Blue finish coat. Inspection procedures, carried out by trained quality technicians using precision inspection equipment, ensured all tolerances were held to ±0.002″.
In the field of high-tech research, there is absolutely no room for error. Our significant investment in manufacturing technology, when combined with a highly trained staff committed to achieving the highest level of perfection, allowed us to deliver this critical component on time, on specification, and on budget. Contact us today to learn more about this project or how our precision large component machining services can benefit your next project.


